Tuesday, November 24, 2015

Toddler "Hulk" Muffins.

We'll be traveling soon and I bought WAY too much baby spinach and bananas... so I scoured the internet for a recipe I could doctor to my liking. I call these "Hulk Muffins" because of their ridiculous green color!

Things I've learned while making these muffins:
  1. I really need a Ninja or Vitamix
  2. I would like one of those huge mini muffin pans
  3. Purplish-brown batter = green muffins?
  4. While little man likes them as is... They are a bit bland, so I may up the spices/fruit next time. I guess you could also add a drizzle of honey, or slap some butter on!
Okay onto the recipe...

----------------------------------------------------------------

Toddler "Hulk" Muffins  
Dairy free, nut free 
  • 2 bananas, mashed
  • 2 cups PACKED baby spinach
  • 1 cup frozen berries (I used blueberries, blackberries, cherries)
  • 1 1/2 cups whole wheat flour
  • 1/2 cup coconut sugar
  • 1/4 cup applesauce
  • 1 egg
  • 1 teaspoon baking soda
  • 1 tsp cinnamon
  • couple twists on a sea salt grinder
1) Preheat oven to 350*
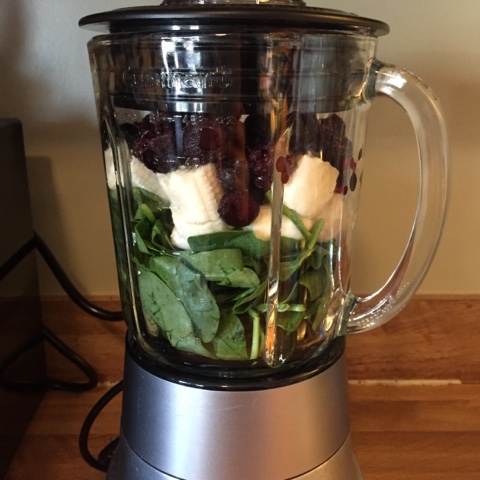
2) Blend bananas, spinach, frozen berries, applesauce, and egg in blender 
3) In a medium sized bowl combine flour, sugar, baking soda, cinnamon, and salt
4) Stir in mixture from blender
5) Fill muffin cups 2/3 full
6) Bake 20-25min until knife comes out clean

Yield: I got 12 regular sized muffins and 7 mini muffins

----------------------------------------------------------------
I told you... these things are GREEN!
Blend.
Stir.
Combine.
Marvel (haha, get it?) at the unique color!
Cool.

And because I'm guessing many of you are saying - "sure, like any kid would eat that" - here's proof of my little dude enjoying one!


Alright, so about that blender. Ninja or Vitamix? ...and go!
-Tay

Giving credit where credit is due: Original Recipe


Friday, November 20, 2015

Fit Friday!- Yoga for Colds.


Adrien from Freckled & Free is here to talk about utilizing yoga to help with colds... If you're following my Instagram you'll notice I just posted about easing back into working out with yoga after my nasty cold. Gotta thank little man for bringing it home from the church nursery, hah!

If you're on Instagram remember to hashtag #fitfriday #yogaforcolds and tag @thedaringdandelion @active_freckals. Thanks for taking this journey with us!
-Tay

-------------------------------------------------------

Yoga for Colds
Its full swing cold and flu season everywhere, especially here in our home.

So far my daughter and I have had two colds each in just over one months time. I was explaining my cold woes to Tay and she suggested yoga, hey at this point I’ll try anything to kick these cold germs to the curb.

So I did a bit of research and found some moves that best worked for my chest congestion and joint pain that I have been experiencing with these past couple colds. Now if you are experienced yogi you can hold these moves for as long as your body can handle, but for most I recommend only holding these poses for 30 seconds to 1 minute max. You can always repeat the moves but I don’t want you to over-stretch.

Bridge Pose: Great way to open your chest. Make sure when you are in this position pushing your pelvis in the air that you are keeping your knees directly over your ankles. Also, no turning of your head so as not to hurt your neck. I choose to grasp my hands rolling my shoulders together but if you prefer less pressure leave your hands relaxed with palms down and shoulders relaxed on the floor.

Camel pose: Another great even deeper position that will open up the chest and back. If touching your feet is too intense place your hands on your lower back with fingers pointing down and just bend back till you feel the stretch. Keep the weight in your knees to really deepen the stretch. Remember to breathe deep in these poses as well to get the most out of your time.

Bow Pose: Stretches the neck, chest, stomach, and back. Hold your toes or ankles pull and lift as high as you can balancing your weight over your belly button, creating a bow shape.

Child's Pose: I apologize for the super blurry picture but this pose always helps my joints feel better. Great pose for stretching out the hips, thighs, and ankles. I had a lot of joint pain this last cold in my hips. Your big toes should be touching during this pose and knees open and wider than your hips, getting your butt as close to heels as possible while lengthening your arms out in front of you, palms facing down.
Here is a better picture from yogajournal.com...

These poses really helped me with my cold and I hope that they also will help you to find relief from your colds.
~Adrien


Disclaimer: Adrien is a Beach Body Coach, however all the moves listed are done at your own risk. Please ensure that your baby can hold their head up on their own before attempting any of these moves. Be sure to consult a doctor before starting any exercise program. The Daring Dandelion along with Freckled & Free assume no responsibility for injuries that may occur while completing the moves utilized in this workout.

Sunday, November 8, 2015

Edenton North Carolina

One of our really good friends is about to deploy and his wife will be headed home for the holidays so we wanted to make sure we got to see them before they both left! Living a state apart doesn't make it incredibly easy, but definitely easier than multiple states/across the country!

We picked a day. Google mapped the "middle" and found a town nearby that offered golfing for the guys and shopping/historic sites for us girls. That my friends is how we ended up choosing "the South's prettiest small town," according to their website

We kept little man's morning schedule as close to normal as possible, but it was moved up one hour. We got up, cuddled/played, ate breakfast, changed clothes, and got in the truck. We packed a change of clothes and shoes for all of us along with sweaters in case the weather got funky. Husband and I had our hydroflasks (love them!) and baby his nuby bottle, along with a bag of adult road trip snacks (beef jerky, granola bars, nuts, and Annie's bunnies) and baby snacks. We set up his "command center" with binky attached for easy access, a swaddle for comfort, a couple books, and his current stuffies of choice Panda & Honu. Away we went!
We met at the golf course and the boys checked in for their tee time while us girls took to Facebook (because where else do you get up-to-date event info?) to find events taking place in the area. We ended up at a craft show at the American Legion, even being one of the first 50 to arrive, earning us a "swag bag," haha! We each purchased an adorable handmade nativity scene to put up next month. Then we headed over to the local farmers market where we bought mini pumpkin bread loaves and chatted it up with the locals. 
Once we ran out of "events" we headed to the town Visitor's center which is actually in the Historic Barker House (built in 1782) right on the Edenton Bay. We sat on the porch for a bit, learned about their Tea Party (happened after Boston's), and got the info for the lighthouse tour. We decided to wait for the guys and do the tour together, so we walked Broad Street (basically their Main Street), and ended up popping into the Edenton Coffee House for some chai tea freezes and turkey panini's. After refueling we walked through all the cute shops before we found the Veterans Memorial, pretty cool considering it was the weekend prior to Veterans Day. We received the phone call from the guys that they were done golfing and headed to the visitor's center so we started our walk back.

Once we met the guys in the parking lot it started pouring, the kind of rain that comes in heavy sheets! So we ran into the visitors center so the guys could check it out and we could buy Christmas ornaments. My husband and I, as well as our friends, purchase an ornament from all the places we travel together. Our Christmas tree is basically the story of our travels! We took more photos on the porch, talked about the future, goofed off with the baby, and the rain finally slowed down enough for us to change shoes and head to the lighthouse.

The Roanoke Lighthouse sits directly on Edenton Bay, it was originally in the middle of the Roanoke River and Lightkeepers completed 3mo rotations. The house had a living room, kitchen/small dining area, and two bedrooms, along with a wrap-around porch. Not too shabby if you don't mind being in the middle of a river! It wasn't a spectacular tour, but our guide was funny and gave us dinner recommendations. Plus it was only $3.50/per... After the tour we walked around the Cupola House and Gardens before heading to Waterman's for dinner.

Once dinner ended we said our "goodbyes" but are already looking forward to getting together next year! I gave my friend a "deployment survival kit" with specific orders not open it until after he leaves... My way of being there with her even though I physically can't. That first week is always rough so I hope the items I included can help with the transition just a bit... Maybe I'll do a post on that later... Since my husband drove there, we prepped baby then it was my turn to drive. It was a whirlwind day, but totally great. If our friends are willing to meet us halfway, I don't see us saying "no," because true friendships are always worth making the trip!

Have you ever done a day trip to visit friends?
-Tay

Sunday, November 1, 2015

Introducing "Thrifty Trends."

I am so excited to introduce this segment, which will be featured on the 1st of every month. Aubrey is another amazing friend I met in Hawaii who just so happens to be an interior designer! I had asked her a while back if she would be interested in guest posting for me and am so happy she said "yes!" 


Each Thrifty Trends post will show you how to achieve the desired look for less. If you're anything like me, I love getting my money's worth, but I am also stingy with what I spend it on.

I don't drink coffee (I know *gasp!*) but I do love tea... here is a current photo of my "tea bar" (*ahem* tea tray) which unfortunately has to sit on top of the microwave in my extremely-limited-counter-and-storage-space of a kitchen. After reading this post I think it's in need of a make-over!

If you complete a project inspired by her post let us know in the comments, if you use Instagram you can also hashtag #thedaringdandelion #freshlybrewedhome #thriftytrends and tag @thedaringdandelion

After you check out this inspiration post, make sure to pop on over to Aubrey's website [A Freshly Brewed Home] for more tips, tricks, and ideas! 
-Tay
 ------------------------------------------------------

Coffee Bars are pretty trendy right now and I see them everywhere! Whether you sleepily fill your mug with keurig coffee, use a french press or you have your own espresso machine, an at home coffee bar is a great accent to your home. The key to creating your own is to accent the pieces you use often with beautiful accessories and consolidate everything onto a shelf, cart or other piece of furniture. Find an area in your kitchen or dining room that is convenient and has an outlet close by. Use whatever fits in your space and piece it together as you find things that speak to you. 

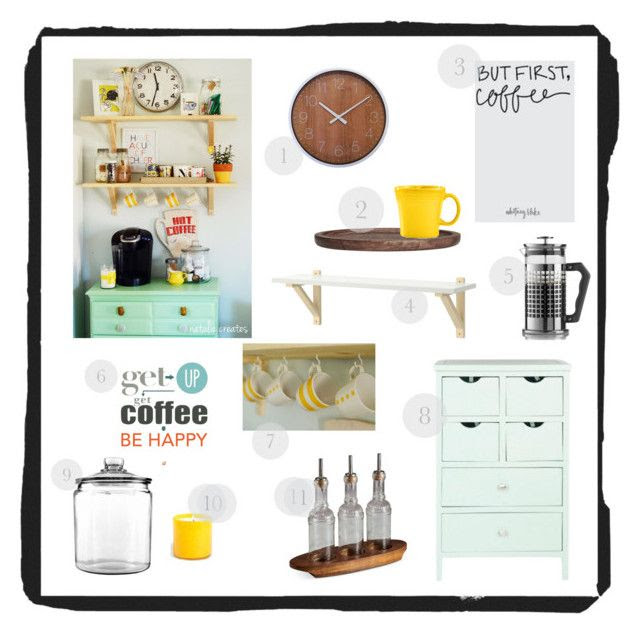
If you're like me, you're on a pretty tight budget. However, that doesn't mean that you can't have a beautiful home. This coffee bar I saw as a great inspiration is actually a DIY project that Natalie at Natalie Creates designed herself. She used a really ugly white dresser and painted it this awesome mint color and added some fun knobs to create her coffee bar.
Case in point...use what you can find at Restore, Goodwill or garage sales and use some creativity (and Pinterest tutorials of course) to make it what you want! I pieced together some inexpensive accessories to give you some inspiration that can take a project to a fabulous spot in your home.
DIY Coffee Bar by aubreyd92 on Polyvore featuring interior, interiors, interior design, home, home decor, interior decorating, Safavieh, Picnic Time, Anchor Hocking and Bialetti: DIY Coffee Bar by aubreyd92 on Polyvore featuring interior, interiors, interior design, home, home decor, interior decorating, Safavieh, Picnic Time, Anchor Hocking and Bialetti
1. This clock is $8.99 at Target

2. This tray is $11 at H&M (but I see similar trays for a buck or two at Goodwill all the time)

3. Find free printables on Pinterest for your artwork! (I do this all the time)

4. This shelf is $12.99 from IKEA. If you don't have access to IKEA (sad day) Walmart has cheap ones as well

5. This French Press is expensive (even on sale) but I see these everywhere-Starbucks, TJ Maxx, etc

6. Just another free printable! (Seriously, there's soooo many cuute ones out there!)

7. You can find hooks anywhere (these are $5 for 15 at Lowes) but make sure you find ones that will fit your mug handles

8. This chest is pricey but it's a good option if you don't want to DIY (but seriously, just find an old bookshelf, dresser, desk...anything that is table/counter height and it will work!)

9. This jar is $5.99 at Target and is perfect for storing k-cups or blends (use whatever works for you or what you have around the house...repurpose those spaghetti sauce jars, mason jars and other glass things!)

10. Find some candles, flower pots, bowls, etc to accent the aesthetic in the rest of your house. 

11. These are so great for storing syrups if you make your own. Just a set from Walmart will do (or make your own using empty wine bottles and oil spouts from Amazon). 

Take away Tips:
  • Don't clutter the space...just display your favorite mugs and hide the rest in the drawers or bins
  • Let it reflect your style...don't use bright pops of color if you love neutrals and don't use vintage accessories if you love modern things 
  • There is no right or wrong way to set up your coffee bar. You can make it as big or as small as you want with whatever pieces you like
  • Remember the purpose of a coffee bar...I know that as a mama and lover of coffee, I need a place that's easy for me to grab everything I need for a pick me up (or really a wake me up..ha!)

Here is my little coffee bar-nothing fancy at all but it has a couple of my favorite things.
And here's some more inspiration I'll leave here for you all!
~Aubrey

Creating Home Coffee Bar

Black and White Coffee Bar


Source-and a cool tutorial of how they changed the space

Friday, October 30, 2015

Fit Friday! - Challenge Update.

Adrien from Freckled & Free started hosting the Fit Fabulous Fall Challenge on October 2nd.

I forgot to take a beginning photo... but I did take one at the halfway mark and today (technically day 28 for me). I don't know if they show much change, but my legs are definitely feeling it and looking WAY more defined!  


If you're on Instagram remember to hashtag #fitfriday #fffsquatchallenge and tag @thedaringdandelion @active_freckals. Thanks for taking this journey with us!
-Tay
--------------------------------------------------------------

Fit Fabulous Fall Challenge - Update
So did you do it?


Did you complete the Fit Fabulous Fall Challenge?

I’ll be honest - I got behind and then got my butt kicked with a super duper sucky cold. Eek. So I am only on Day 17 but I will finish this challenge even if it is later than everyone else.

That is the nice thing about exercise, as long as you keep trying everyday to get closer to your goals and never give up, you will eventually reach them.

Here are a list of things I have learned since beginning this challenge…
  • My legs, my body are stronger than I imagined.
  • I am capable of doing 100 squats in under 5 minutes.
  • My daughter loves to watch me workout. Sometimes I hold her while squatting, other times she is on the floor playing but no matter what she is doing, once I begin squatting she squeals and laughs the whole time. She is my favorite little cheerleader! 
I hope you were also able to learn some new things about yourself while completing this challenge. If you have not finished the challenge yet, keep going!
~Adrien

Below is my “Before” picture and me today:
Halfway and almost Done!

Thursday, October 29, 2015

Cullipher Farm - Pumpkin Patch.

If you follow me on Instagram, I've been posting teaser photos from our trip out to the farm...

This past weekend we headed down to Pungo and hit up Cullipher Farm. We searched and searched for a pumpkin patch that didn't have an entrance fee, because honestly little man is way too young for all of the kids activities and we really didn't feel like spending an hour or so in a cornfield trying to find our way out of a maze. Our second desire was a patch that you actually PICKED them, aka: off the vine. Cullipher Farm fit the bill!

We arrived and instantly got a laugh at the parking situation, because well you know "there's something 'bout a truck, in a farmer's field..."


We headed to the main area for the "low-down," it was decorated with cute crates, mums, and an assortment of pumpkins and goards (I never knew there were SO many different kinds). They also had a small "market" under the tent offering ciders, fall flavored baked treats, butters, and jams.


We waited until after we got our pumpkins ($8 for all three! We got a traditional Jack, a blue Haikido, and a white Cotton Candy, so fun...) to shop at the market and came away with a 1/2 gallon of apple cider, a small jar of apple butter, as well as the most delicious pumpkin ice cream!

The farm is open through November 1st, so if you're still looking to go you have THREE days! Check out their website for full information.
-Tay
Friday, October 23, 2015

Fresh Face.

My friend Rachel, over at Cozy Chic Mommy, recently blogged about "Less is More." I commented on the Instagram photo linking the post - saying that on busy days I slap on some spf moisturizer, a little mascara, chapstick, and call it good.

I completely agree with her sentiments about contouring, fake lashes, and hair extensions... I don't see the point. I personally can't imagine waking up in the morning and taking that much time before I went out the door... I am in my late 20s. I am a mom. I still get acne. My face is not some "flawless" super model... I am just me and I am okay with that. I had a friend in high school who had never seen her step mom without make-up on?! She would wake up before anyone else in the house and cake the stuff on, I used to wonder if her husband even knew what she looked like under all of it... I never got the nerve to ask, which is probably good, I don't think a 15yr old asking their carpool driver a question like that would go over very well.

I don't have a younger brother like Rachel does, but I do have a son. A son I want to raise watching me put on make-up. I am a woman and it is nice to have a fresh face, but I am not about caking it on, or using "tricks" to completely change my look. I want him to respect a woman for who she is, what she believes in, and what she is working towards. NOT solely on her looks! I also want him to see me at night and in the mornings with no make-up on. To take him camping and to the beach where its completely unnecessary and silly to even think of bringing make-up. To let him know that women are beautiful because God created them in his image, just like he was created in God's image. The media, advertisers, and socialites want us to think that "flawless" is perfection. I want my son to think that each woman is unique, beautiful in her own way, and doesn't need to look like the photo-shopped women in magazines, posters, and billboards.

The picture below is my non-rushed day time make-up. This is a completely un-edited photo, snapped with my phone right before heading out to get groceries:


The only think I add for evening (aka: date night or special events) is a bit more under-eye concealer (eek) and some pretty eye shadow.

Here's what I used:
  1. Moisturizer (earlier in the morning right after I washed my face)- Olay
  2. Primer- BareMinerals
  3. Foundation- BareMinerals
  4. Blush- Ulta (similar item)
  5. Eyeliner- Revlon (similar item)
  6. Mascara- Gabriel
  7. Lipstick- Ulta
This entire "look" takes me maybe 10min on a good day. Its natural looking, but covers any zits/redness, however I like the mineral powder because it still shows my freckles.

How long does it take you to have a "fresh face" in the mornings?
-Tay