Showing posts with label holidays. Show all posts

Friday, March 25, 2016

Good Friday +Recipe ("Crack"er Toffee)

Last weekend we drove up to Fredericksburg, VA to meet with friends living in Maryland as well as friends from Portland that flew in to spend a week with the Maryland friends, followed by a week with us. It was so much fun getting together again - it had been 2yrs since we had all lived in the same place (Hawaii) and we have added 3 more kids to the group! Easter will be our first major holiday here in Virginia that we don't have travel plans or family coming to town for. It made me a bit sad thinking about our time in Hawaii because we were such a close knit group always making sure everyone was included in holiday potlucks, etc. considering we were all thousands of miles away from family in the middle of the Pacific Ocean...

Anyway, today is Good Friday and for us that means remembering the sacrifice of our Savior Jesus Christ. We may not be truly settled into a church or have that amazing group of Friends, but the knowledge of what Jesus did for us on that Cross is enough! Christ gave it all so we may have it all in heaven. It's Friday, but Sunday is coming!

Photo credit: Verses Project


I recently made some Cracker Toffee also known as "Dessert Crack" (bad name, I know!) since once you have a piece you won't want to stop eating it, it's SO addicting! This particular batch was Easter/spring themed, but I've made it for Christmas and I'm pretty sure you could make it for absolutely any occasion by changing the type of chocolate and toppings. If you're still looking for a dessert to bring to your Easter potluck, this is quick and simple!


---------------------------------------------
"Crack"er Toffee
  • Approx 50 Saltine Crackers
  • 1 cup butter (2 sticks)
  • 1 cup packed brown sugar
  • 2 cups dark chocolate chips (or any type of chocolate you prefer)
  • M&Ms for topping (I've used slivered almonds as well)
1) Preheat oven to 325*
2) Line a baking pan (mine is 17.25x11.5x1in) with foil and grease
3) Arrange saltines on pan
4) Place butter and brown sugar in a small sauce pan over medium heat
5) Once the butter melts completely, bring to a boil and stir constantly for 2min until nice and bubbly
6) Pour mixture onto the saltines, spread it quickly with a spoon/spatula
7) Place in oven for 8min
8) Remove from oven and immediately sprinkle the chocolate chips on top
9) Allow chips to sit for a minute then spread them evenly over the toffee layer
10) Sprinkle M&Ms
11) Sit on counter until cool (you can pop in the freezer for 10min but I don't recommend more unless you plan to store these in the fridge because the chocolate will sweat/melt)
12) Once completely cool and set, peel off foil and break into chunks
13) Will keep in an airtight container on the counter for 1wk (2wks in the fridge), but I doubt it will last that long!
---------------------------------------------


HAPPY EASTER!!!
-Tay

Tuesday, February 9, 2016

DIY Watercolor Prints

I'm going to come out and say it... Pinterest has made motherhood ridiculous.


Okay, now that that's off my shoulders I have an EASY toddler friendly craft for you. Just be smart and buy washable water colors and know that there will be paint on the baby, the floor, and possibly the wall next to the stairs (I still can't figure that one out, he's a magician I guess).

Here's what you need:
- Cardstock Paper (I actually used thick sketch paper)
- A white crayon
- Washable water color paints
- Thick paint brushes for little hands

Optional: newspaper in attempt to contain the mess!

Steps:
1) Draw your designs on the paper, make sure you have GOOD lighting, especially if you want to go over the same area a couple times to thicken up the design. I did this the night before after I put my son to bed.
2) Set-up your paint station.
3) Wet brush, and dip in paint.
4) Show toddler how to paint the paper.
5) Randomly trade out brushes with new colors.
6) Just go with the mess!

The beauty of these are that you can change the designs for any time of the year... Spring flowers, fall leaves, etc. 

Don't have kids? That just means your watercolor art can be "perfect." Think color gradients, even and matching strokes, non-soaking wet paper, haha!

These Valentine's are on their way to family all over the country (hopefully they already arrived so we don't blow the surprise!), if you make some please share with me either in the comments below or on Instagram by tagging @thedaringdandelion.

Happy painting!
-Tay

Sunday, December 13, 2015

DIY Chocolate Peppermint Spoons.

In a pinch for a last minute gift? Try these chocolate spoons!

Ingredients:
Heavy duty plastic spoons - don't get lightweight plastic, we don't want to risk any melting during the creating process or for the gifted during their enjoying process! Peppermints (or candy canes), and chocolate of choice - white, dark, milk, semi-sweet...
Place your peppermints (or candy canes) in a ziplock baggie, gently (my first bag exploded all over my kitchen!) whack them with a wooden spoon.

Melt your chocolate either in the microwave or on the stove, watch closely as chocolate can burn! Dip the spoons and slowly rotate them to get a nice even coating.

While the chocolate is still melted, sprinkle with the crushed peppermint. Place on wax paper to dry. You can expedite the process by placing in the fridge or freezer, but I have much better luck just keeping them on the counter. Every time after I try using the fridge/freezer method they are moist to the touch and melt quickly once I take them out (not ideal for gift giving).

Seal as desired. I used traditional sandwich baggies, some scotch tape, and a bit of baker's twine.

Create your final gift by combining with hot cocoa packets in a festive mug (both can be found at the dollar store if you're on a tight budget!)

Do you have any awesome last-minute, but doesn't look "last-minute," gift ideas? 
Please share them with me in the comments!
-Tay

Friday, December 11, 2015

My Christmas Tour.


I've posted my DIY Christmas Wreath on Instagram, but I figure it would be nice to give you a "mini tour" of my home decor!

The front of my house greets you with bright multi-colored lights, candy canes, and of course the three wise men seeking baby Jesus.
My DIY wreath graces the front door, I used the remaining ribbon to wrap my banister. The centerpiece for my dining table is a mason jar filled with mini scented pine cones, a bit more of the ribbon, a $1 deer, and an apple-spice candle.
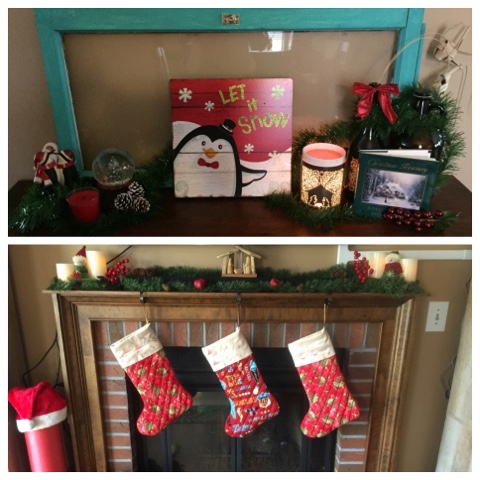
The buffet features small decor gifts we have been given over the years, our wood penguin plaque, and my scentsy with the nativity wrap. My mantle is wrapped in garland, LED candles, stuffed snowmen, a driftwood nativity I purchased on our Edenton trip, and the stockings we had made in Hawaii.
The final pieces adorn our bookshelves: German nesting dolls from our trip to the Baltimore Christmas Village, an antique Christmas swing from my grandma's house, an LED glass gift my mom made, then another wood nativity and my Santa nativity (yes I love the nativity, I have a beautiful stained glass one my grandpa made but we couldn't figure out where to put it without risking little man breaking it). The tree is "toddler safe," plastic, wood, and metal ornaments only this year... Maybe our glass & reisin ones can be added back in a few years.

Besides decor, scents make me feel more in the holiday spirit, so I burn a candle nightly. We also watch cheesy Christmas movies often.

How is your house looking?
-Tay