Monday, May 2, 2016

"Oil Slick Hair" - Manic Panic Hair Dye Review

If you are on any form of social media these days I'm sure you've seen "oil slick" or "mermaid" hair... if not, open a new tab and do a quick google search. Alright, now that we're on the same page, awhile back I decided I wanted to do a hidden oil slick because I wasn't brave enough to do my entire head! My sister had recently dyed her entire head in an ombre purple but she had to strip and bleach her hair first. I wasn't cool with that and I didn't want to use a permanent dye either, I like the kind that gradually washes out over time... so the research began, I ended up deciding on Manic Panic Dyes.


These dyes are vegan friendly (which I didn't even know was a concern with hair dyes, but there you go!) and semi-permanent. We had a trip planned to visit my family so I asked my sister if she could pick-up these colors from Sally's Beauty and some supplies in preparation for my arrival.

One Sunday afternoon we set-up shop in my parents back yard and she went at it... She separated my hair into sections then applied the colors randomly (completely in no particular order like the rainbow you see in an actual oil slick), then she rolled it in foil, and moved onto the next section.


The end result was so vibrate and amazing looking!


I wanted to see how long the colors lasted, so my plan was to take a weekly update photo. I missed a couple weeks but you can see that the vibrancy started to fade after a bit. My hair really held onto the red (which actually doesn't surprise me since I naturally have strawberry blonde hair in the summer time). I'm currently 8 weeks post-dye and I still have some red streaks throughout.

1 Week -- 2 Weeks -- 3.5 Weeks -- 6 Weeks

So for my hair, with no bleaching or stripping:
  • Purple Haze - washed out within the first week
  • VoodDoo Blue - actually looked teal in my hair (which I liked!) but was basically gone by 3.5wks
  • Infra Red - Still going... I like it!
We had half a jar left of each color so I wanted a simple travel solution, luckily I found out my son's Parent's Choice Puffs container fit them perfectly! I just taped the lid shut and threw it in my suitcase.


The only down side to these dyes that I found was the transfer when my hair was wet. I purposely put an old pillow case on my nightly pillow. I had red and purple streaks on it. I will confess that I am guilty of putting my hair in a top knot while wet from the shower and just going to bed. I also used an old beach towel for my hair when getting out of the shower, it also showed red and purple streaks... I think my hair may have held the colors longer because I only wash it between 4-5 days and use dry shampoo in between, but I can't vouch for that.

Anyway, if you're looking for a fun twist on hair, I do recommend Manic Panic Dyes! Maybe just dry your hair before going to bed unlike me ;)

Have you ever done anything crazy with hair color?
Let me know in the comments!
-Tay

*I was NOT compensated by Manic Panic - I just wanted to share my personal experience and pass it on to ya'll!

Friday, March 25, 2016

Good Friday +Recipe ("Crack"er Toffee)

Last weekend we drove up to Fredericksburg, VA to meet with friends living in Maryland as well as friends from Portland that flew in to spend a week with the Maryland friends, followed by a week with us. It was so much fun getting together again - it had been 2yrs since we had all lived in the same place (Hawaii) and we have added 3 more kids to the group! Easter will be our first major holiday here in Virginia that we don't have travel plans or family coming to town for. It made me a bit sad thinking about our time in Hawaii because we were such a close knit group always making sure everyone was included in holiday potlucks, etc. considering we were all thousands of miles away from family in the middle of the Pacific Ocean...

Anyway, today is Good Friday and for us that means remembering the sacrifice of our Savior Jesus Christ. We may not be truly settled into a church or have that amazing group of Friends, but the knowledge of what Jesus did for us on that Cross is enough! Christ gave it all so we may have it all in heaven. It's Friday, but Sunday is coming!

Photo credit: Verses Project


I recently made some Cracker Toffee also known as "Dessert Crack" (bad name, I know!) since once you have a piece you won't want to stop eating it, it's SO addicting! This particular batch was Easter/spring themed, but I've made it for Christmas and I'm pretty sure you could make it for absolutely any occasion by changing the type of chocolate and toppings. If you're still looking for a dessert to bring to your Easter potluck, this is quick and simple!


---------------------------------------------
"Crack"er Toffee
  • Approx 50 Saltine Crackers
  • 1 cup butter (2 sticks)
  • 1 cup packed brown sugar
  • 2 cups dark chocolate chips (or any type of chocolate you prefer)
  • M&Ms for topping (I've used slivered almonds as well)
1) Preheat oven to 325*
2) Line a baking pan (mine is 17.25x11.5x1in) with foil and grease
3) Arrange saltines on pan
4) Place butter and brown sugar in a small sauce pan over medium heat
5) Once the butter melts completely, bring to a boil and stir constantly for 2min until nice and bubbly
6) Pour mixture onto the saltines, spread it quickly with a spoon/spatula
7) Place in oven for 8min
8) Remove from oven and immediately sprinkle the chocolate chips on top
9) Allow chips to sit for a minute then spread them evenly over the toffee layer
10) Sprinkle M&Ms
11) Sit on counter until cool (you can pop in the freezer for 10min but I don't recommend more unless you plan to store these in the fridge because the chocolate will sweat/melt)
12) Once completely cool and set, peel off foil and break into chunks
13) Will keep in an airtight container on the counter for 1wk (2wks in the fridge), but I doubt it will last that long!
---------------------------------------------


HAPPY EASTER!!!
-Tay

Thursday, March 24, 2016

Ohana.

For those of you who have never left home (I'm talking more than those 4yrs of college or moving a town away) I don't really know how to explain this accurately but I will do my best.

Moving somewhere completely new changes you in ways you can never understand. Moving to an island in the middle of the Pacific Ocean thousands of miles away from anyone you know adds a whole new element. My time in Maryland was short all of 16mo, we did find a church and a group of friends to "do life" with, most of which we keep in touch with today. But Hawaii is where our life really became "our own."

Within 3 months of moving there I started having debilitating panic attacks - to the point of throwing up, jolting awake, and having to go to the ER twice within 2wks. We were desperate for answers, desperate for a place to call home (been in an hotel room for 60 days and ended up in a temporary apartment for 3mo before renting our home on base), and desperate for a place to fit in.

We tried a few churches, but once we walked into Hope Chapel Kaneohe Bay (now Anchor Church) we knew we were "home." I started attending a women's study and we planned to join a married group once my husband returned from his upcoming deployment. The women in my small group got me through my anxiety issues, supported me during the deployment, and some became very close friends that I talk to daily/weekly even now!


Once my husband returned we jumped into a young married's group and the rest is history... Weekend get togethers, impromptu dinner nights, beach & boat trips, hikes, holiday parties & potlucks, rallying around those who moved/were sick/had kids/etc. These people were our Ohana, we knew if we needed something all we had to do was call. Even if our car broke down on the other side of the island, someone would show up! Thousands of miles away from home and we still had that safety net. There's just something about that island. That life. That time. I will never forget those moments or people.

I need to find that here. 

Friday, March 11, 2016

Fit Friday! - Leg Day Challenge

It's been a long week... on Tuesday Little Man and I had an 11.5hr travel day. 3 flights, 2 huge storms, rude people, not feeling well, etc. So the past two days were pretty much "recovery." I also got busy this morning and lost track of time, missing the Stroller Aerobics class at the gym, good thing I opened up my e-mail and this little baby was inside!
-Tay


As always, if you use Instagram don't forget to tag 
@thedaringdanedlion @active_freckals and this month #legdaychallenge

----------------------------------------------------

Bringing back the Alphabet Challenge but this time we will be focusing on your bottom half. So spell out your full name with the alphabet below and GET TO WORK!

Remember you can break up the final total through out the day to make it more manageable. Don’t forget to take pictures then tag us @thedaringdandelion and @active_freckals to let us know you are following along!
~Adrien

Sunday, March 6, 2016

Reaching Out

I hate being the "new girl" but inevitably I am every few years. New state, new city, new base, new roads, sometimes a new language, and always... always... new faces. 

Before we got married, I remember packing - well cramming - everything I owned into my Mazda 3 and making the grueling drive across the country with my dad. It was great for us, we bonded, stayed in crappy hotels, saw amazing things, and even went up inside the St. Louis Arch. The trip didn't change me, the day my dad left did. I was alone... my soon-to-be husband was at work, and I wasn't in Arizona anymore!


We flew back to get married but afterwards it was the same old story. Lucky enough for me one of my husband's friends and co-workers had a great wife! She invited me over, we went out to lunch, she let me get us completely lost then pointed me in the right direction, she went to the commissary with me for the first time, and we bonded really well. Later they threw a BBQ and there I was introduced to a bunch of the other Marine wives... now everyone didn't welcome me with "open arms" to say, but eventually I became good friends with most of them, which is quite a feat with a group of women, can I get an "amen?" Haha!

About 5mo into my time in Maryland a new wife from my husband's company arrived, she actually moved in one street away from me. I went over to say hello and from there I became the girl who invited her over, took her out to lunch, etc. She was also pregnant and when I found out she hadn't had a baby shower... that just wouldn't do, so I opened my home, planned the whole thing, and threw her a shower.


The majority of us have now left Maryland... Some (like myself) have already PCS'd again!  We are now in Pennsylvania, Wisconsin, Texas, and Virginia... but we'll never forget each other and the things that were done for us. From my second duty station I have friends back in Maryland, New York, California, North Carolina, Florida, Oregon, Colorado, Hawaii, Germany, Japan, and England (probably a few more I'm forgetting)! 

I tell you all of this to say- reach out! Don't let the "new girl" mope around in her house, be alone, and have to learn everything all by herself. Honestly, who wants or should have to do that? 


Obviously you won't stay in touch with everyone you meet. My super close friends are actually from our time in Hawaii rather than Maryland... but I am so thankful for my learning experience there. So please reach out, because who knows, your next best friend or deployment sister could be waiting!
-Tay


Wednesday, March 2, 2016

Almond-Coconut Cookies.


Cookies are so much fun to bake and my little man loves to help mix, clean the beaters, and watch them in the oven. These cookies are great since they are vegan and he can safely eat the batter, gluten free, and refined sugar free!

Besides my peanut butter cookies these are becoming a staple in our house and are in their way there in our friends homes as well!

Almond-Coconut Cookies
Gluten free, vegan
* ¾ cup almond flour, firmly packed 
* ¼ cup coconut flour, firmly packed 
* 1 heaping teaspoon baking soda
* ½ teaspoon sea salt
* Dash cinnamon 
* ½ cup coconut oil, melted
* ¼ cup maple syrup
* ¼ cup honey
* 1 teaspoon vanilla extract
* 1 cup dark chocolate chips/chunks

1. Mix together almond and coconut flours with the baking soda, salt and cinnamon. 
2. Pour in the melted coconut oil, maple syrup, honey, and vanilla extract
3. Stir in the chocolate chunks
4. Preheat oven to 350*
5. Place dough in freezer for 10-15min (I mix my dough in the kitchen aid so I just place the whole bowl in the freezer)
6. Line a baking sheet with parchment paper
7. Roll dough into 1in balls and place 1.5in apart from each other
8. Bake for 12min
9. When you remove them from the oven leave on the baking sheet for 5min then carefully slide parchment paper onto a cooling rack - the cookies are fragile but completely firm up once cooled (however they are delicious and ooey-gooey out of the oven!)
10. Store in an airtight container in the counter for up to 1wk

Yield 24-36 cookies depending on how evenly you roll the cookies.

Wednesday, February 17, 2016

Thrifty Trends - Sprucing Up Your Laundry Room


This post is so refreshing considering this is what I deal with on the daily...

We're renting and the laundry is located below the stairs, across from the half-bath (which I actually stood in for the photos since the hallway is only wide enough for the bathroom door to swing open!). Aubrey even caught me on laundry day- so real life photo post of my laundry mess! My favorite thing about my laundry room closet is the sign above that I've had since 2011, haha! Someday when we purchase a house, I'll know exactly what I want after living in a new place every 2-4yrs!

If you complete a project inspired by her post let us know in the comments, if you use Instagram you can also hashtag #thedaringdandelion #freshlybrewedhome #thriftytrends and tag @thedaringdandelion @aubreylouiseb

After you check out this inspiration post, make sure to pop on over to Aubrey's website [A Freshly Brewed Home] for more tips, tricks, and ideas! 
-Tay
 ------------------------------------------------------

Let's be honest, doing laundry is hardly anyone's favorite thing to do... but everyone has to do it so we might as well make it a pretty space! If you're like me, you hate spending a lot of money on decor especially for something that is to fit a specific space when you know you'll be moving in the future. But that doesn't mean you don't have to do anything to a room...small details likes rugs and wall art make a huge difference! Invest in pieces that you know can work in other spaces so that you can play Tetris with all your decor when you move.

Now I know not everyone has a laundry room with a sink or cabinets or room for large bins (heck, mine is literally a closet with bi-fold doors and a stack of builder grade shelves) but you can still make your room (or closet) a space that functions well. Here are a few thrifty tips on how to get a functional and beautiful laundry room.

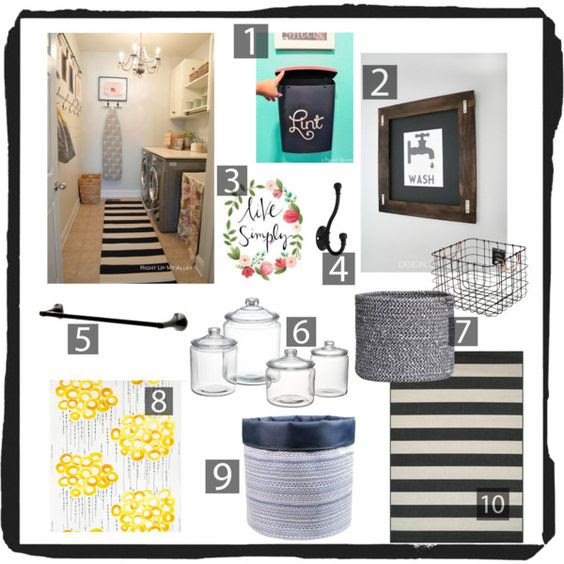
A home decor collage from February 2016 by aubreyd92 featuring interior, interiors, interior design, home, home decor, interior decorating, Couristan, Threshold...:
  1. Find a mailbox like this one here for $12.95 to put lint and small trash in (or just use a small basket)
  2. Free printable from Pinterest put into a frame
  3. Another free printable from Pinterest
  4. Get two hooks from Lowes at $3.97 each, mount them on a scrap piece of wood to create a cool ironing board holder that hangs on the wall
  5. Install a towel bar (cheaper than a curtain rod) like this one underneath a cabinet or just on the wall for a place to hang clothes
  6. You can get glass jars like this at Walmart for $5.89 or you can find similar ones to mix and match at thrift stores (usually for just a buck or so). When you store things like laundry detergent, clothespins or oxi clean in them, it automatically makes them look fancier!
  7. Use storage baskets like this for $12.99 at H&M and this for $15 at Target for storing towels, missing socks or just keeping your dryer sheets and Tide to-go sticks out of sight
  8. Cover a sink front with a homemade fabric curtain to hide buckets and other utility items. I liked this particular fabric which is $8.99 for a 5'x5' piece at IKEA. Or visit your local craft store and raid the clearance bin for cute fabric. Buy some iron-on hemming tape (typically a buck or two) for a no-sew hack.
  9. Use a storage bin or two to sort laundry
  10. Don't forget to add a rug like this one from Wayfair for $45. A sturdy indoor/outdoor one would probably be best in a utility space but if standing on a fluffy rug would make doing laundry feel fancier, then get one!
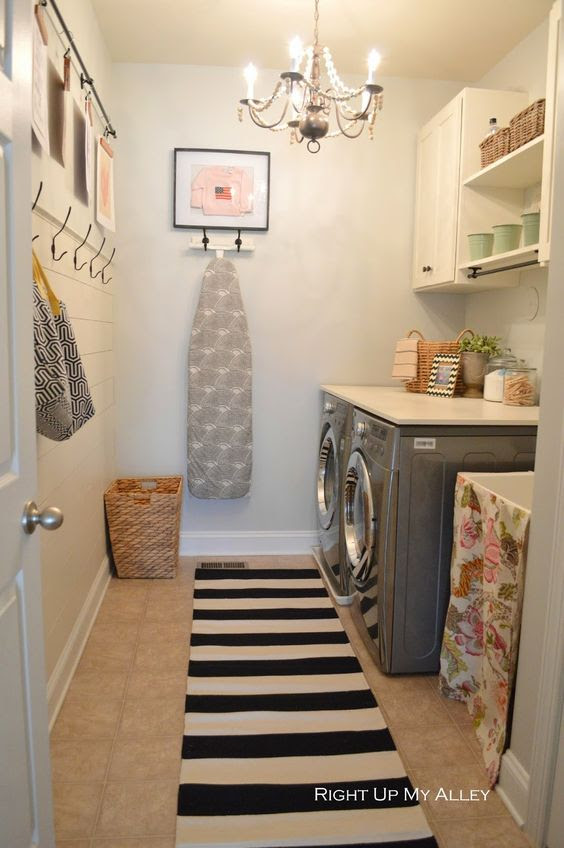
Here is the inspiration photo that I used. Tracy at Right Up My Alley used some DIY hacks and simple little changes to update her laundry room and made it a bright and cheery little space. I love that she framed a little sweatshirt that all of her girls wore when they were babies...so sweet!!! And such a great idea to make personal art!

I also love how she chose to store her ironing board...brilliant! And her chandelier is great. Most people I know that rent, can't change their lighting...but if you can, please do! It makes such a difference. Find an old chandelier at your ReStore and spray paint it. Tracy added beads to hers and I love that detail.

Laundry Room Reveal:
Source

I know everyone has different taste and styles so here are a few more inspiration photos of beautiful and functional laundry rooms. They don't need to be anything fancy, I promise!

Chris Loves Julia Home Design blog. kinda like the pipes! Also really like the hampers and folding self. I could do this!:
Source

Builder-grade Laundry rooms get a Farmhouse Modern Makeover, oozing with charm! To see the reveal, visit DIY beautify:
Source

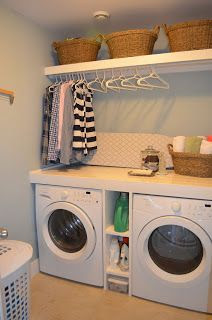
Fun Home Things: 10 Laundry Room Ideas. The counter atop the washer/dryer and shelf above with room for hangers is all SO great!:
Source

There are a few things these spaces have in common...rugs, shelving, a space to fold clothes and a rack to hang items after they're washed. Add in some meaningful or funny artwork, some storage baskets and containers and your laundry room can turn from boring to beautiful! You don't have to spend a fortune to make your space more fun...go "shopping" in your own home and go explore your local thrift stores. Find some fun pieces and you'd be surprised how much of a difference a rug, some artwork and glass containers can make!

Happy Decorating,
~Aubrey
You can find me here:
(where I post inspiration photos daily)
and